Table of Contents

According to the World Health Organization, over 1 billion people – about 15% of the global population – require accessibility features. Different sources report that more than 60% of the world’s population has internet access, and it’s estimated that 10% have some form of disability.
The main point of interaction between humans and internet-connected devices is a screen and keyboard. Devices and screens must offer keyboards that help them bypass the inherent accessibility issues across the web.
For instance, it’s estimated that 4% of the population has some form of color blindness. Color coding your keyboard for color-blind people can be achieved by using themes. Without a doubt, many people will benefit from that, and making your keyboard inclusive will be an advantage.
Suppose you include features for the visually impaired. In that case, it’s possible to accommodate for various levels of disability by adding a quick access button from the keyboard to increase keyboard size or a quick key to access voice typing. With complete control of the layout of the keys in your development, users can — for example, switch the layout for one hand typing with a swipe.
Creating your custom keyboard using Fleksy’s SDK will give you the advantage of implementing proper accessibility. For instance, if you want to build an accessibility-focused keyboard app, you can use the customization possibilities. Keyboard size, keyboard layout, hotkeys, and quick accesses can be added easily to harmonize with built-in accessibility features of operating systems like Android and iOS.
It’s important to also plan for accessibility, as that’s the perfect time to make it cost-effective. It’s estimated that over 96% of the world’s top one million websites don’t offer full accessibility, and it’s likely to remain that way because it’s expensive in terms of – not only money but also the effort to make a site or app accessible after launch. Luckily, there are readily available tools that you can use while building your keyboard app – or any other app, to make it accessible and stand out.
Luckily, major hardware and software creators – as well as individuals and open-source communities, are taking accessibility into account more and more. With that in mind, different tools, in the form of libraries or built-in code editors, will assist you in your accessibility efforts.
Testing for Accessibility on Apple Devices
Apple emphasizes accessibility features as how people personalize their interaction with their devices in ways that work for them and defines an accessible app or game as one that supports accessibility personalizations by design.

With that concept as the starting point, Apple considers being a best practice to design with accessibility in mind and “prioritizing simplicity and perceivability and examining every design decision to ensure that it doesn’t exclude people who have different abilities or interact with their devices in different ways.”
For that reason, Apple considers that developers must audit and test their apps and games for accessibility. Proper accessibility testing ensures that you’ll implement and fix your app so that everyone can complete the most important tasks, regardless of how they interact with their devices.
Apple advocates for developers to try user flows in their apps or games with accessibility features to gain first-hand experience with the challenges that people with disabilities face. Once you’ve seen how the user flows may lack accessibility, it’s time to dig deeper and attack the root causes. Luckily, Apple provides the Accessibility Inspector feature with Xcode to help you audit, test, and fix accessibility in your apps.
Accessibility Inspector
To help developers meet accessibility standards, Apple provides the Accessibility Inspector testing tool in Xcode.
The Accessibility Inspector enables you to identify parts of your app that are not accessible. It provides feedback on how you can make them accessible, as well as simulating voice-over to help you identify what a Voice-Over user would experience.
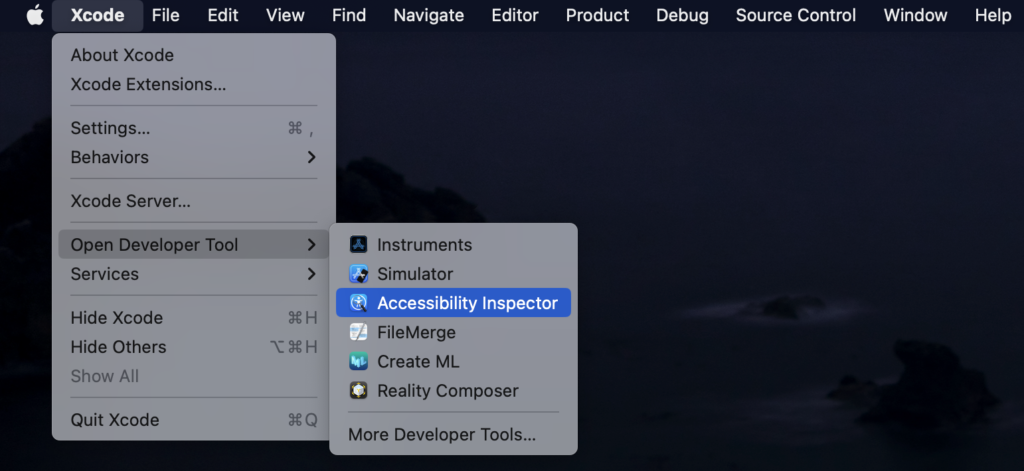
To launch the inspector, go to Xcode > Open Developer Tool > Accessibility Inspector in the menu bar or Dock. The Accessibility Inspector displays a utility window that presents the information properties (and values), action methods, and position in the accessibility hierarchy of the object currently under the mouse pointer.

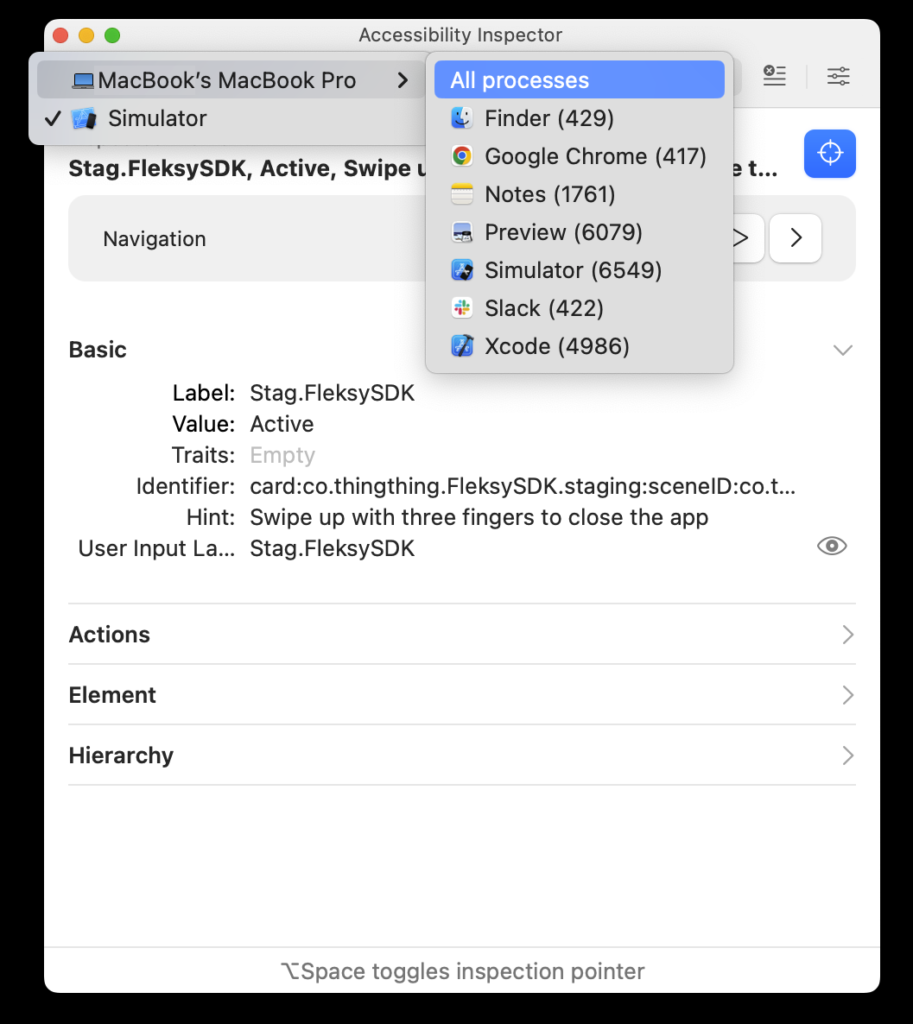
On the left side of the Accessibility Inspector, there’s a menu where you can select the targeted device. This can be your Mac, a simulator, or an actual device if you have one connected. There are no limitations when it comes to the apps you can analyze. They can be your own or from a third party.

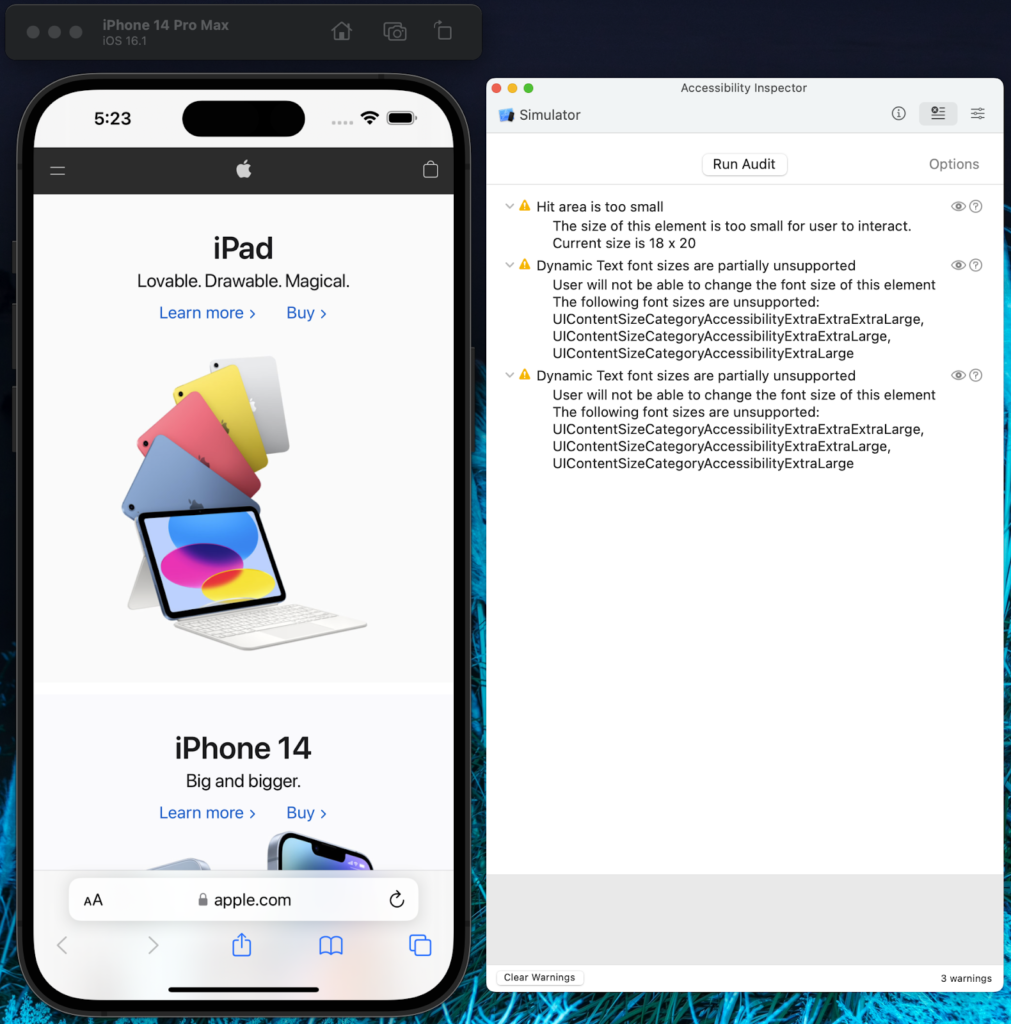
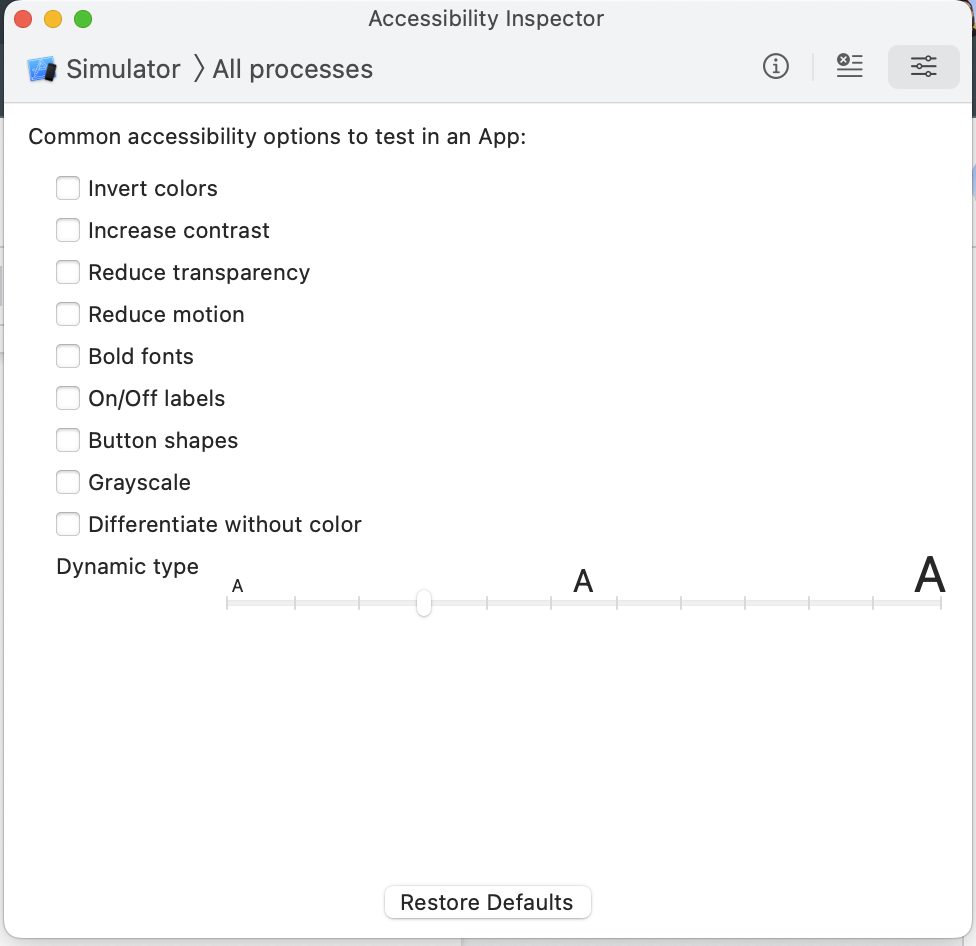
The Accessibility Inspector tool contains three options in the right menu: Inspection, Audit, and Settings. The first option is to check information about elements in the targeted screen, like the label, value, traits, etc., given to an image or button, for example.
With the second option, you can audit the app or web in the target. When pressing the ‘Run Audit’ button on this screen, the Accessibility Inspector will create a list of warnings with the potential issues and optimizations related to accessibility.

The third option gives you access to accessibility settings. This will help validate different settings, like increasing contrast, font sizes, and motion.

Accessibility Verifier
The Accessibility Verifier tool is also included in Xcode and can be launched by choosing Accessibility Inspector > Window > Accessibility Verifier. When you have a selected app and run Accessibility Verifier, it shows the accessibility hierarchy and all its currently instantiated objects.
You can use Accessibility Verifier to perform any or all of the following tests:
- Parent/Child. Checks the integrity of the accessibility hierarchy by making sure each parent-child pair forms a closed loop.
- Window. Checks that all objects contained in a window contain a reference to that window in their accessibilityWindow property.
- Missing AXDescription. Checks the element’s accessibilityLabel property. All accessible elements must provide some context-specific, descriptive label.
- Role Verification. Verifies that an accessibility object implements all the properties and methods required for its role.
Accessibility Verifier runs the tests you selected and displays the results every time you click Verify. Depending on their severity, you will see any problems reported as warnings or errors.
Other tools to help you with mobile accessibility on iOS
GTXiLib
Google Toolbox for Accessibility is a framework for iOS accessibility testing. GTXiLib is written in Objective-C and integrates with your existing XCTests to perform all the registered accessibility checks before the test tearDown. You can use GTXiLib with any XCTest-based framework, such as EarlGrey.
The existing test also fails when you run your tests, and the checks fail. In other words, GTXiLib enhances the value of your tests by installing “accessibility checks” on them. This way, your existing test cases can double as accessibility tests with no other code change on your part.
GTXiLib includes other advantages, like:
- Since it integrates into your existing functional tests, you can reuse them. Any test that already exists or you create in the future will include accessibility checks.
- You can install GTXiLib onto a single test class, test case, or a specific subset of tests, which means you can easily add incremental accessibility testing to your projects.
- You can use GTXiLib simple API to author your custom checks based on your app’s specific needs. For example, you can ensure every button in your app has an accessibilityHint using a custom check.
Testing for Accessibility on Android
Accessibility Insights for Android
Accessibility Insights for Android is free, and open-source tool developers use to find and fix accessibility issues in Android apps. You can use this tool on Windows, Mac, and Linux. It’s also worth mentioning that you can test apps on hardware or virtual Android devices.
Before using Accessibility Insights for Android, make sure you have the following:
- Android Debug Bridge (adb) or a similar tool to communicate with the hardware or virtual device.
- If you’re testing on a hardware device, enable developer options and debugging.
You will then connect your device depending on what you’re using. If you use a hardware device, you’ll have to connect it via USB and allow the computer to access it. If it’s a virtual device in Android Studio or the Android Virtual Device Manager, select a virtual device and select Run.
Accessibility Insights for Android will check your configuration and walk you through the completion of your setup. Depending on your setup, the tool will display one or more messages asking if you want to opt-in or out of telemetry and other settings. If the app can’t find adb on your computer, you’ll see a message to enter the path to (or browse to) the folder that contains the adb.exe file.
If you need to turn on or grant permissions to the Accessibility Insights for Android service on your device, go to Settings > Accessibility > Installed services > Accessibility Insights Service and turn on the service. When the first permission dialog appears, select OK. When the second permission dialog appears, select Start now.
With the setup complete, you’ll see the message “Connected and ready to go!” each time you use Accessibility Insights for Android.
Run tests
- To run tests on the current device and app:
- Select Start testing.
- To run tests on a different app:
- On your device, open the app you want to test and navigate to the screen where you want to start testing.
- Select Rescan devices.
- Select Start testing.
- To run tests on a different device:
- Connect the device you want to use.
- On the device, open the app you want to test and navigate to the screen where you want to start testing.
- Select Rescan devices.
- Follow any instructions that appear.
- When the device is visible in the Connected and ready screen, select Start testing.
Other tools to help you with mobile accessibility on Android
Accessibility Test Framework for Android
As stated on the GitHub page, to enable people with disabilities to access Android apps, developers need to think about how their apps are presented to accessibility services.
It’s known that some good practices can be verified by automated tools, such as if a View has a contentDescription. However, other rules require human judgment, such as whether a contentDescription makes sense to all users.
The Accessibility Test Framework for the Android library collects various accessibility-related checks on View objects as well as AccessibilityNodeInfo objects (which the Android framework derives from Views and sends to AccessibilityServices).
This tool is also integrated into Android Studio to help find accessibility issues in your layouts. To launch the panel, click on the error report button in the Layout Editor.
Accessibility Scanner
Accessibility Scanner is a tool that suggests accessibility improvements for Android apps without the need for technical setup or much previous knowledge. It’s an excellent tool for stakeholders across teams, like product managers, designers, and other decision-makers, as they can use this app to suggest changes to developers or to help prioritize accessibility tasks.
It’s simple to use, and that’s why this is the perfect tool for cross-functional teams to assess and make decisions regarding the accessibility of their apps. To use the Accessibility Scanner, you need to open the app you want to scan, then tap the Accessibility Scanner button to find items in the app that might benefit from accessibility improvements.
Integrating Accessibility Features into Custom Keyboards with Fleksy’s SDK
Creating an accessible custom keyboard involves thoughtful design and leveraging the capabilities provided by Fleksy’s SDK. Here are some practical tips and best practices to help you integrate accessibility features into your keyboard app:
1. Implement Customizable Keyboard Sizes
- Dynamic Resizing: Allow users to adjust the keyboard size to their comfort. Utilize Fleksy’s SDK to enable dynamic resizing of keys and overall keyboard dimensions.
- One-Handed Mode: Provide options for one-handed use by adjusting the keyboard layout to one side of the screen.
2. Enhance Visual Accessibility with Themes
- High-Contrast Themes: Offer high-contrast color schemes to assist users with visual impairments.
- Color Customization: Allow users to customize key colors, backgrounds, and fonts to accommodate color blindness and personal preferences.
- Test for Color Blindness: Use color-blindness simulators to ensure your themes are legible to all users.
3. Support Screen Readers
- Accessibility Labels: Assign descriptive labels to all keys and buttons so screen readers like VoiceOver (iOS) and TalkBack (Android) can accurately describe them.
- Gestures and Navigation: Ensure that gesture-based controls are accessible and have screen reader support.
4. Provide Haptic and Audio Feedback
- Haptic Feedback: Utilize the SDK to incorporate vibration feedback when keys are pressed, aiding users with visual impairments.
- Audio Cues: Implement sounds or spoken feedback for key presses and function changes.
5. Enable Voice Input and Dictation
- Voice Typing Integration: Leverage the SDK to add voice input capabilities directly from the keyboard.
- Speech-to-Text Accuracy: Use high-quality speech recognition services to ensure accurate transcription.
6. Optimize Touch Targets
- Larger Tap Areas: Increase the size of touch targets for keys to assist users with motor impairments.
- Spacing and Layout: Adjust spacing between keys to prevent accidental presses.
7. Accessibility Settings Shortcut
- Quick Access: Include a dedicated button or gesture to access accessibility settings within the keyboard.
- User Preferences: Allow users to save and quickly switch between different accessibility configurations.
8. Ensure Compatibility with Assistive Technologies
- Assistive Apps Support: Test your keyboard with popular assistive technologies to ensure compatibility.
- API Compliance: Follow platform-specific accessibility APIs and guidelines provided by iOS and Android.
9. Provide Clear Visual Indicators
- Focus States: Highlight keys or sections when selected or focused, aiding users who navigate via keyboard or assistive devices.
- Feedback on Actions: Display visual feedback for actions like key presses, mode changes, or errors.
10. Conduct Thorough Accessibility Testing
- User Testing: Engage users with disabilities to test your keyboard and provide feedback.
- Automated Testing Tools: Utilize accessibility testing tools to identify and fix issues early in the development process.
- Continuous Improvement: Regularly update your keyboard to address accessibility concerns and incorporate user feedback.
By incorporating these best practices using Fleksy’s SDK, you can create a custom keyboard that is accessible to a wider audience, enhancing usability for all users. Focusing on accessibility not only complies with legal standards but also delivers a better user experience, leading to increased adoption and user satisfaction.
Final words
Implementing accessibility features and subsequent accessibility testing has become crucial to launching a product and can influence its success. There are only benefits in including accessibility features in your app or website, even if these don’t seem like wins immediately.
When in doubt about improving the accessibility of your product, think of this example: a (proper) ramp on a sidewalk will make it accessible to people in wheelchairs; that’s a fact. However, the ramp can also benefit people carrying baby strollers, people using crutches or canes, people with motor disabilities that have difficult movement, little kids that have to ride their bikes on the sidewalk where the law requires, people in skates, and the list goes on.
In case you have any suggestions or need help with improving the accessibility of your Android or iOS apps, consider joining Fleksy’s Discord server to get in touch with our team.